
Going Linux
The Podcast
Receive new episodes automatically.
Subscribe for free:

This work
is licensed under a
Creative Commons Attribution 3.0 License.
Going Linux
Practical Information for Using Linux To Get Things Done


In Episodes 29 and 31 of the podcast, we discuss specific applications you can use to backup the data on your computer. We mentioned Clonezilla Live as one of those applications, but this is not your average Linux backup utility. It is a Live CD (you boot from the CD to use it) that can make backups of your entire hard drive, including your Linux AND Windows partitions. This means that whether you have a single operating system on yoru hard drive, or if you dual-boot your computer, you can make a complete backup of all your partitions in a single step. In addition, you can compress the final backup image so that if you are backing up a 250 GB hard drive that is 50% full (it has 125 GB of free space) the backup will not take a full 250 GB of space on the backup drive.
Using Clonezilla Live
Here is the step-by-step on making a backup of a 40 GB hard drive onto an external USB drive. Unlike some other backup programs, Clonezilla does not ask you whether you are making a backup or restoring from one until almost the end of the menu selections. As a result, although these instructions are for making a backup to an image file, they are almost identical for the restoration process. Note that since the menus of selections are presented in text screens, you will be using the tab key and the arrow keys to move between selections, the spacebar to mark options, and the Enter key to accept your choices and move to the next screen.
- Boot your computer from the Clonezilla Live CD.
- At the boot screen, select the default.
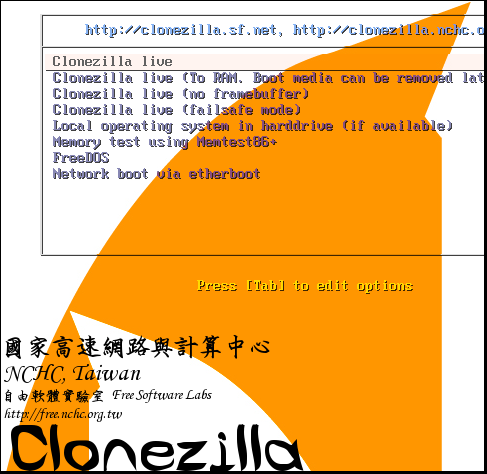
- Allow all the text to scroll past the screen as Clonezilla determines your hardware configuration and completes the bootup process.
- Choose a language. English and Traditional Chinese are your choices.
- Select a keyboard layout if you use a non-standard keyboard, otherwise the default will work fine. Choose to start Clonezilla.
- You can choose to make a disk-to-disk backup or a diks to image backup. I chose:
device-image disk/partition to/from image - To make your backup to an external device like a USB drive, select:
local_dev Mount local device - You are then prompted to insert usb device.
- In
my case, the screen showed two hard drives. Cursor to the one that
represents the destination for your backup files. Use the spacebar to
make your selection. Here are the selections that appeared on my screen:
( ) hda1 (a long description of my hard drive)
(*) sda1 (a description of my external USB 2.0 drive) - Mounting an external USB drive could take a long time, depending on such factors as your computer's processor speed and RAM, and the size of the USB drive, so BE PATIENT! When prompted, press <Enter>.
- The
next screen is where you indicate whether you want to make a backup or
restore from one, and whether yu want to save the entire disk or
individual partitions. Your choices are:
savedisk Save_client_entire disk
restoredisk Restore _client_entire_disk
saveparts Save_client_partitions
restoreparts Restore_client_partitions
exit
I chose the first option. - At the priority menu, you can choose which programs Clonzilla will use, and in which order. Your choices are:
-q Priority: ntfsclone > partimage > dd
-q1 Priority: Only dd (support all filesystem, but inefficient)
-q2 Priority: ntfsclone, parclone (experimental) > partimage > dd
Priority: partimage > dd (no ntfsclone)
The first choice is the best in most cases. It tries ntfsclone to make a backup of any NTFS (Windows) partition, then partimage and dd to backup any Linux partitions. - The next screen shows advanced
extra parameters. Only the first option is selected by default, and
that is the way I left it.
[*] -c Client waits for confirmation before cloning - Next, you have a choice of compression settings. The first one worked fine for me.
-z1 Use gzip compressionn (fast but smaller image)
-z2 Use bzip2 compression (slowest but smallest image)
-z3 Use lzo compression (faster, image size ~ gzip)
-z0 without compression (fastest but largest image) - You are prompted to give the image a name. The default name indicates the date of the backup.
- Next, select the disk to backup. In my case there was only one choice:
[*] hda disk description - Clonezilla then provides a summary of what is being backed-up, and where the backup will be located. Make sure that you have chosen the right
- Finally, you are asked one final question:
Are you sure you want to continue ? (y/N)
HowtoForge has created an excellent, illustrated article on how to back up and restore hard drives using CloneZilla Live. Click here to see the tutorial.
Search
our audio
files
Search our site
Search our site
